

I did it! I made my own queen-sized headboard. If you haven’t yet tried making a headboard – don’t be intimidated. This project is super gratifying. I had a huge sense of satisfaction. I think it’s because it is relatively simple and inexpensive but makes such a big difference.
The method I used had easy shortcuts that may cost a little more but save on time. For instance, I used an already made frame and a nailhead trim kit instead of individual nailheads. So, while I spent about $80 on this headboard, you could definitely do it for less if you wanted to put forth a little more effort instead.

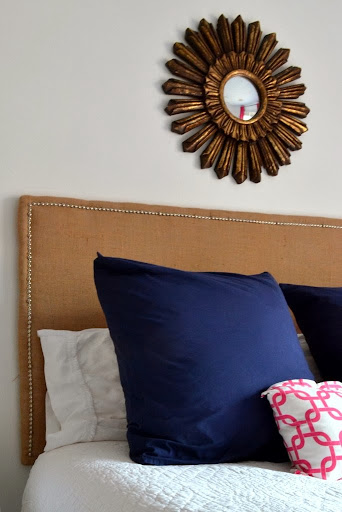
With the bed in place, I measured how tall and wide on the wall I wanted my headboard to be. My measurements came out to be 30in x 60in. I went to a local art framing store and asked for a wood frame in the dimensions needed. He put the frame together in about fifteen minutes. The frame was the largest expense.
Next, I wrapped two layers of quilt batting (from Hobby Lobby) around the frame and stapled to the back. I used right under 2 yards of brown burlap, from a local fabric store, to cover the batting and then stapled it to the back of the frame as well. Finally, I used this nailhead trim kit from Amazon along the edge of the front of the headboard. This is a strip of tacks that are connected and every 5th one has a hole where you nail in a real pin. I nailed it through the burlap and batting directly into the wood frame.
Once the trim was nailed in, I screwed two d-rings (often used for picturing hanging) into the back of the frame, eight inches from each end.

A. helped me install the anchors and screws in the wall, after we made sure it was level, and then I just hooked the headboard on to the screws. The craftsmanship is not exactly perfect (will try to straighten the trim a little better) but it works beautifully and I’m still proud of it.

See? It really wasn’t that hard! And the possibilities are endless with all the different fabric choices and wood shapes you can choose. Have you made your own headboard? Or made something else that was not big on effort but big on impact?
-J
Sharing with House of Hepworths, Frugal Friday, Tuesday’s Treasures, Tutes & Tips
It looks great. I’ve done a few, but none with nailhead. I definitely want to try it. Where did you find the nailhead strips?
Thanks. I ordered them from Amazon! Click here.
It looks SO so good!! I am in love with those nailhead kits.
Great job! Wonderful idea!
looks great will definetly ref back if i decide to try it
Love it. Great juxtaposition of the burlap with the nailhead trim. Well done you. Thanks for sharing, liz