

I am conflicted by the results of this latest change but I’m here to share it nonetheless. I have commented often on my complete disdain for the molding in the living room. It’s not the molding itself, it’s the color of the stain. It just immediately identifies 1986!
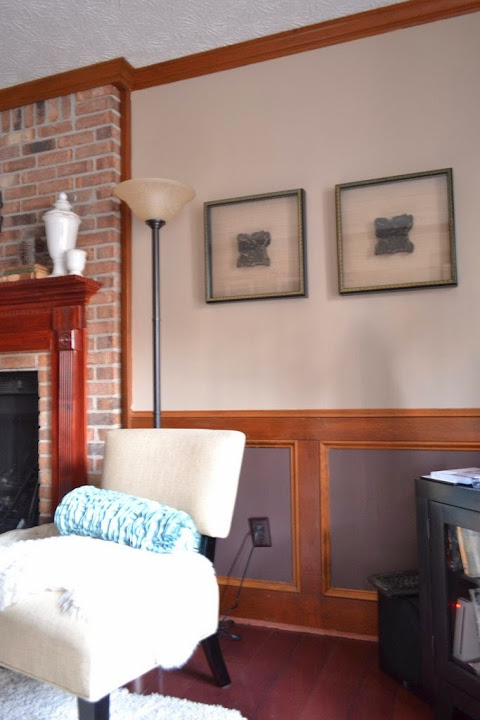
In addition to it’s orange undertones and general awfulness, it seems that different types of wood were used to piece it all together. Some of the pieces stained differently than others resulting in quite a mix of wood tones in the room.
Having to work around this molding (my husband requested that it not be painted white) was the driving factor for the paint colors on the wall. I tried to choose colors that cooperated well and toned it down instead of accentuating it.
So, I say all of that to say: I changed it! The molding is now darker and richer. I do like the color a lot better than before but it’s not perfect and the process was a nightmare.
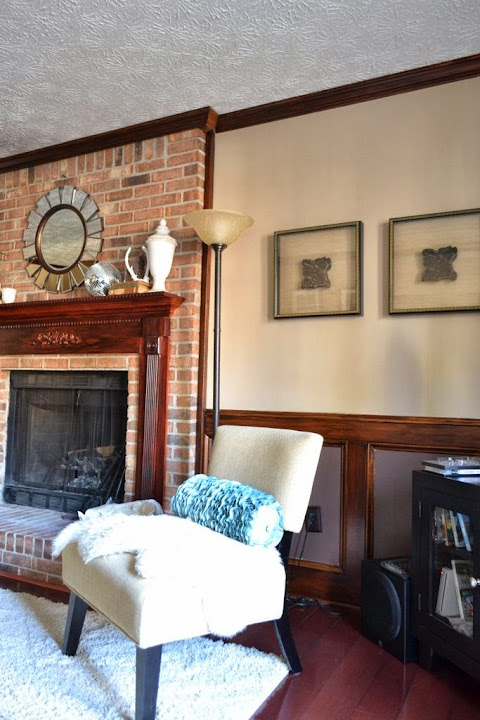
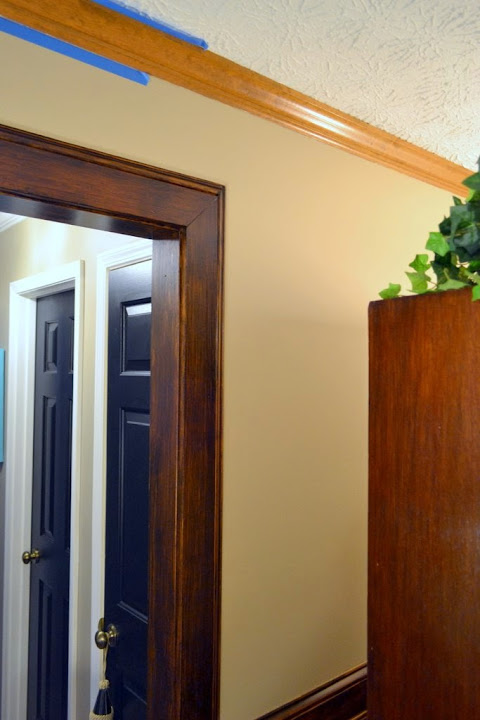
I used Miniwax Polyshades in Espresso to update all of the wood trim in the room. I first started with a natural bristle stain brush and spread the product on the wood but later switched to a foam brush. I found the product hard to work with. First of all, I did sand very lightly over the wood before applying the product. Here you can really see the color difference between the untouched crown molding and the updated door trim.
You can’t use too much of the product on the brush and even using thin coats, it doesn’t spread easily. I think it’s basically a tinted polyurethane. It seemed like once it’s exposed to the wood you are applying it to and the air it becomes hard to work with and smears. That makes blending in where you stopped and where you need to reapply a bit hard. It took me two hours to do all the trim on one wall (the wall the couch is on). The instructions say you should then sand again, with steel wool, and reapply another coat. I did this in one small area and quickly decided I would not be doing it on the rest of the room because the product was hard to work with and the final coat just too dark for my preferences.
So that’s the conflict: I wouldn’t recommend the product used, but I’m happy the 1986 orange-hued wood is gone.
-J
I had the same thing happen when updating the stain on my master bath vanity from the 70’s. Apparently, I did not sand enough to remove more of the previous stain. Also it took DAYS to dry and did not go on smoothly, left drips, etc. I am thinking the Polyshades is meant more for bare wood. I would like to hear if there is a better product. I also have some chair legs I would like to change the stain on. I do love your stain color, though!
Yeah, the instructions imply you don’t HAVE to remove all of the old stain you just have to sand enough to rough up the surface for adherence, but that doesn’t quite work. It dried pretty quickly for me, but it wasn’t a smooth application. Let me know if you hear of anything else!
I used that product once on my old cedar chest after I stripped the original finish off. I found it difficult to work with too, even on bare wood. But your end result looks really good! I wonder if a gel stain might work with sanding the surface a bit. It’s thicker than a regular stain, but I think easier to work with than the Polyshades.
I used it to refinish a dresser and bureau and it was a pain. At least your kitchen is not yellow!